Have you ever seen a beautifully marbled sourdough loaf and wondered how to achieve that vibrant, creative look? Marbling your sourdough is easier than you think! In this guide, I’ll walk you through the process step-by-step. Share my favorite tips, and answer common questions so you can bake your own unique marbled sourdough loaf.
Whether you’re experimenting with one color or two, or even three! This method will help you create a loaf that’s as eye-catching as it is delicious.

What Is a Marbled Sourdough Loaf?
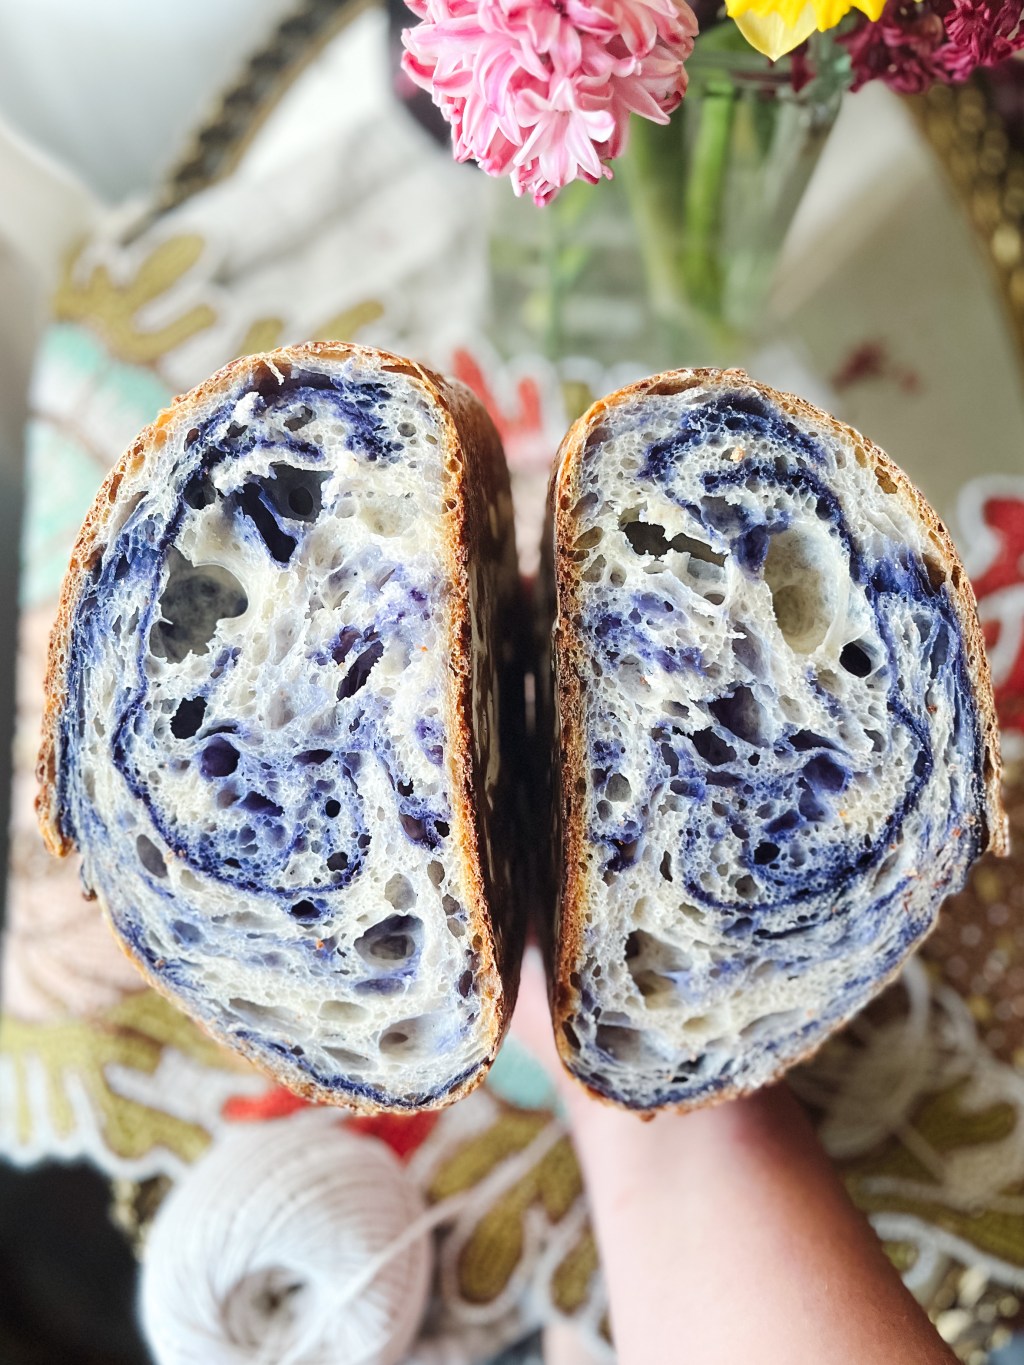
A marbled loaf incorporates streaks of color into your sourdough bread for a stunning visual effect. You can use natural food coloring powders in colors like blue butterfly pea flower powder, purple sweet potato. Or even spices or teas like turmeric and matcha to create swirls that resemble marble. This technique is perfect for special occasions or when you just want to have some fun with your sourdough.

How to Marble Your Sourdough Dough
Materials You’ll Need:
- Sourdough dough (Ready for coil folds)
- Natural color powders (like butterfly pea powder for blue or purple sweet potato powder)
- Gloves (optional, but helpful for avoiding stained hands)
- Bench Scraper
Step-by-Step Instructions
If you do more than 3 coil folds, don’t add color until your last 3 folds. Otherwise, you will lose the marbled look.
1. Add Your First Color
Sprinkle about half to a full spoonful of your chosen color powder evenly over the dough. Don’t worry if it looks like a lot—this ensures vibrant marbling! Then, carry out a coil fold to incorporate the color.
2. Add Your Second Color (Optional)
If you’re using a second color, switch to it during your next fold. Sprinkle the powder just like you did with the first color and repeat the coil fold. If you’re sticking to one color, simply add more of the same powder during the next two folds.
3. Add Your First Color (Again)
Sprinkle more of your first color over the dough, and preform the third coil fold. Then cover your dough and allow it to bulk ferment.
Quick Tip: I have noticed some colors will speed up bulk fermentation, and others will slow it down. Pay close attention to a marbled loaf during bulk fermentation.
4. Pre-Shape Your Dough
Some bakers skip pre-shaping, but I find it helps create a neat marble effect. Pre-shape by pulling your loaf along the counter then let rest for 10 minutes. This helps to create more striations of color.
4. Shape Your Dough
Shape your dough as usual. Then place it in a proofing basket. Cover it and put your dough in the fridge overnight.


Tips for a Successful Marbled Loaf
⭐ Choose Your Primary Color Wisely: If you want one color to dominate, use it first. It is more prominent in the final loaf. I stick to colors I know will work well together. I choose either all warm colors or all cool colors so they won’t muddy.
⭐ Protect Your Hands And Your Proofing Basket: Some color powders can stain skin. If you have light-colored nails or bare hands, wear gloves. If stains happen, try rubbing your fingers with a mix of lemon juice and sugar. Line your baskets with a tea towel to protect them from staining.
⭐ Manage Air Bubbles: Certain powders speed along fermentation and can create extra large air bubbles in the dough. Don’t be afraid to pop them if they are bigger than a golf ball. Let your dough rest for 10 minutes afterward to recover.

Common Questions
What Type of Powders Should I Use?
Natural powders like butterfly pea, purple sweet potato, and radish, or turmeric work well. They’re vibrant, safe to use.
Will The Powders Change The Flavor?
Natural powders sometimes have an odor. Usually it bakes out. Some powders will change the flavor slightly. Personally I don’t notice any flavors, but some people with more sensitive palettes notice a slight flavor.
Can I Skip the Pre-Shaping Step?
Yes, pre-shaping is optional, but it helps pull the color through the dough to create a marbled effect. Without it, your dough look more swirled, which can also be beautiful!
How Do I Remove Color Stains from My Hands?
A mix of lemon juice and salt or sugar works wonders for lifting stains caused by natural powders.
My Color Disappeared?
Some colors are really effected by the heat of baking like beets and dragon fruit and spirulina. My best advice is to check with reviews, Facebook groups, Instagram, and baker friends. I discovered some colors bake out. I made a pink loaf with beetroot. When I cut it open, it was yellow!

Why Try a Marbled Loaf?
Marbled sourdough is more than just bread—it’s a statement piece for your dining table,. Marbling your sourdough lets you get creative and experiment with colors, making each loaf unique and edible creative expression. Plus, it’s a great conversation starter at gatherings or a stunning addition to your baking repertoire.
If you’re ready to give marbling a try, gather your ingredients, follow these steps, and let your creativity shine. Share your results and tag me—I’d love to see your colorful creations!
Looking for high-quality natural color powders? Check out my recommendations here. Happy baking!


Leave a comment